DropBox Connector for UiPathRead / write DropBox data inside your app; perform many DropBox operations without coding, just use easy to use high performance API Connector for DropBox In this article you will learn how to quickly and efficiently integrate DropBox data in UiPath without coding. We will use high-performance DropBox Connector to easily connect to DropBox and then access the data inside UiPath. Let's follow the steps below to see how we can accomplish that! DropBox Connector for UiPath is based on ZappySys API Driver which is part of ODBC PowerPack. It is a collection of high-performance ODBC drivers that enable you to integrate data in SQL Server, SSIS, a programming language, or any other ODBC-compatible application. ODBC PowerPack supports various file formats, sources and destinations, including REST/SOAP API, SFTP/FTP, storage services, and plain files, to mention a few. |
Connect to DropBox in other apps
|
Create ODBC Data Source (DSN) based on ZappySys API Driver
Step-by-step instructions
To get data from DropBox using UiPath we first need to create a DSN (Data Source) which will access data from DropBox. We will later be able to read data using UiPath. Perform these steps:
-
Download and install ODBC PowerPack.
-
Open ODBC Data Sources (x64):

-
Create a User data source (User DSN) based on ZappySys API Driver
ZappySys API Driver
-
Create and use User DSN
if the client application is run under a User Account.
This is an ideal option
in design-time , when developing a solution, e.g. in Visual Studio 2019. Use it for both type of applications - 64-bit and 32-bit. -
Create and use System DSN
if the client application is launched under a System Account, e.g. as a Windows Service.
Usually, this is an ideal option to use
in a production environment . Use ODBC Data Source Administrator (32-bit), instead of 64-bit version, if Windows Service is a 32-bit application.
-
Create and use User DSN
if the client application is run under a User Account.
This is an ideal option
-
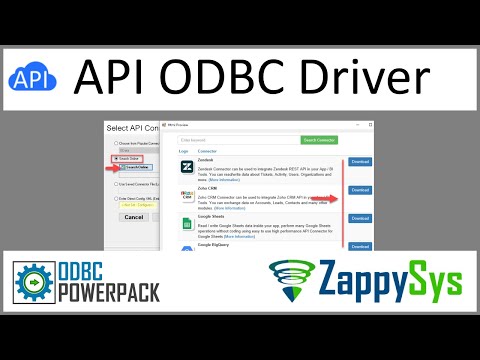
When the Configuration window appears give your data source a name if you haven't done that already, then select "DropBox" from the list of Popular Connectors. If "DropBox" is not present in the list, then click "Search Online" and download it. Then set the path to the location where you downloaded it. Finally, click Continue >> to proceed with configuring the DSN:
DropboxDSNDropBox
-
Now it's time to configure the Connection Manager. Select Authentication Type, e.g. Token Authentication. Then select API Base URL (in most cases, the default one is the right one). More info is available in the Authentication section.
Steps how to get and use DropBox credentials : User Account [OAuth]
To use OAuth authentication, firstly, you need to create OAuth application:
- Log into your DropBox account.
- Go to DropBox My Apps.
-
Then press Create app button to create a new app:

-
Once a new page opens, select Scoped access option:

- Next, select Full Dropbox to access all files and folders or App folder to access specific folder's files and folders option.
- Continue by giving your app a name.
- Then check I agree to Dropbox API Terms and Conditions checkbox.
- Click Create app button.
-
Once a new page opens, click Enable additional teams and Enable additional users buttons:

- Then copy App key and App secret and copy paste them into your favorite text editor (you will need them later).
-
Proceed by setting a Redirect URI and clicking Add button.
NOTE: If you don't have a working Redirect URI, you can use
https://zappysys.com/oauth(it's safe). -
Then click on Permissions tab and select application scopes:

- Select all Individual Scopes and Team Scopes if you want to manage team data.
- Click Submit button.
- Now go to SSIS package or ODBC data source and in User Account authentication set these parameters:
- For ClientId field use App key value.
- For ClientSecret field use App secret value.
- For ReturnUrl field use Redirect URI value.
- Done! Now you are ready to use Dropbox Connector!
NOTE: If you are planning to use your current data connection/token for automated processes, we recommend that you use a generic account for token generation when the login box appears (e.g. sales_automation@mycompany.com instead of bob_smith@mycompany.com). When you use a personal account which is tied to a specific employee profile and that employee leaves the company, the token may become invalid and any automated processes using that token will fail. Another potentially unwanted effect of using a personal token is incorrect logging; the API calls (e.g. Read, Edit, Delete, Upload) made with that token will record the specific user as performing the calls instead of an automated process.Fill in all required parameters and set optional parameters if needed:
DropboxDSNDropBoxUser Account [OAuth]https://api.dropboxapi.com/2/Required Parameters UseCustomApp Fill-in the parameter... ReturnUrl Fill-in the parameter... Optional Parameters ClientId ClientSecret Scope RetryMode RetryWhenStatusCodeMatch RetryStatusCodeList 429 RetryCountMax 5 RetryMultiplyWaitTime True 
-
Once the data source connection has been configured, it's time to configure the SQL query. Select the Preview tab and then click Query Builder button to configure the SQL query:
 ZappySys API Driver - DropBoxRead / write DropBox data inside your app; perform many DropBox operations without coding, just use easy to use high performance API Connector for DropBoxDropboxDSN
-
Start by selecting the Table or Endpoint you are interested in and then configure the parameters. This will generate a query that we will use in UiPath to retrieve data from DropBox. Hit OK button to use this query in the next step.
SELECT *
  FROM make_test
Some parameters configured in this window will be passed to the DropBox API, e.g. filtering parameters. It means that filtering will be done on the server side (instead of the client side), enabling you to get only the meaningful data
much faster . -
Now hit Preview Data button to preview the data using the generated SQL query. If you are satisfied with the result, use this query in UiPath:
ZappySys API Driver - DropBoxRead / write DropBox data inside your app; perform many DropBox operations without coding, just use easy to use high performance API Connector for DropBoxDropboxDSNSELECT * FROM make_test You can also access data quickly from the tables dropdown by selecting <Select table>.A
WHEREclause,LIMITkeyword will be performed on the client side, meaning that thewhole result set will be retrieved from the DropBox API first, and only then the filtering will be applied to the data. If possible, it is recommended to use parameters in Query Builder to filter the data on the server side (in DropBox servers). -
Click OK to finish creating the data source.
Video Tutorial
Read DropBox data in UiPath Studio (workstation)
Here we will be reading DropBox data on your workstation. To accomplish that we will create and run UiPath process package locally. Later on, we'll explore how to publish the package to Orchestrator and run it remotely. For now, let's focus on working locally and get started!
- Open UiPath Studio.
- Before we really begin the work, make sure UiPath Studio is set as your profile (blue application icon).
-
In case, it is set to UiPath StudioX, you can change it in UiPath StudioX Settings:
 Simply select UiPath Studio option:

-
Start by creating a new project based on UiPath Process template:

-
Add Run Query activity in Main Sequence box:

-
Click Configure Connection... button to create an ODBC connection:

-
Continue by clicking Connection Wizard:

-
When the window opens, select ODBC-based driver, provider, and then choose ODBC data source:
DropboxDSNDropboxDSN
 You can also select Use connection string option and use whole ODBC connection string instead. Obtain the connection string by pressing Copy Settings button in your data source configuration.
 -
Once you do that, it's time to configure a SQL query:
 Make sure, you enclose the query in double quotes!
 -
Proceed by adding a Write CSV activity after Run Query:
 In this article we are using Write CSV, but you can freely add any other destination of your choice, e.g. Write DataTable to Excel.
 -
Once you do that, configure the added Write CSV, this will write DropBox data to a CSV file:

-
It's time for fun! Which means it's time for debugging! Just run the package locally to debug:

-
Finally, ensure there are no execution errors!

Run UiPath package using Orchestrator (via robot)
UiPath also offers the ability to execute packages remotely using Orchestrator and a robot. This is achieved by publishing the package to UiPath Orchestrator, installing UiPath Assistant on the remote machine, connecting it to Orchestrator, enabling us to run the package remotely. It may sound complicated at first glance, but further steps will clear things out. Let's not waste our precious time and delve into the details!
Publish process package from UiPath Studio
- First of all, open the UiPath process package we created in the previous step
-
Set the option that our process package Starts in Background:

-
We are ready to Publish it:

-
Make sure, you publish it to the Shared folder in UiPath Orchestrator Tenant workspace:

-
Finally, success! We are ready for the next step - creating UiPath robot - so we can automate the job:

Create robot in UiPath Orchestrator
-
First of all, let's open UiPath Orchestrator from UiPath Automation Cloud console:

-
It's time to create a robot, which will run unattended packages:

-
But first we have to create a runtime. Choose to host our robot on-premise, not in UiPath infrastructure:

-
Let's move along and Create new machine template, this will create a machine in UiPath Orchestrator:

-
Configure the machine to run in Production environment:

-
We are ready to Create new robot account in the new machine:

-
Let's make our robot to work only on background automations:

-
Continue by selecting newly created robot:

-
Select Shared folder, so that everyone in the team can benefit from it:
 This is the folder where we published our UiPath process package "MyProcess"
 -
We are almost done!
We are given machine Client ID and Client secret which we will use to connect UiPath Assistant to our created machine in Orchestrator.
Let's leave this open for a while and see how we can do it in the next step.

Connect UiPath Assistant to Orchestrator
We are ready to connect UiPath Assistant to the machine we created in Orchestrator. UiPath Assistant will run our package in a remote machine. Let's connect it and give it some work!
- Connect to a remote machine (where your UiPath process package will be running).
- Install UiPath Studio there.
- Then configure ODBC data source:
If you chose Use user or system data source option in connection configuration, when creating UiPath process package, then create an identical ODBC data source on the same remote machine. Use the same configuration as the one created in your workstation in the first step.
Use Copy Settings and Load Settings buttons to make your life easier. They will help you to transfer settings between different ODBC data sources.If you chose Use connection string option, then you don't have to do anything. However, you still have to install ODBC PowerPack on the remote machine.
-
Continue by opening UiPath Assistant and going to Preferences:

-
Find Orchestrator Settings menu item and click it:

-
And here even bigger fun begins! But fear not, all you have to do is open your web browser window with Client ID & Client secret we obtained in the previous step and simply copy and paste those values into UiPath Assistant. Also, don't forget to configure Orchestrator URL:

-
Finally, we get rewarded for the hard work with the Connected as Unattended status:

Create and run UiPath process in Orchestrator
We are at the finish line! Let's create and run UiPath process. This will execute the package on your remote machine using the UiPath Assistant configured earlier.
- First of all, open UiPath Orchestrator from UiPath Automation Cloud console.
-
Then proceed by going to Process in Shared folder:

-
Continue by simply clicking on Add process button:

-
Select the process package we created in UiPath Studio:

-
Rest a while, and just hit Next, unless your package has requirements:
")
-
Then simply hit Create button:

-
But let's not stop here and Start the process by creating a job right away:

-
Use the same Production runtime we created before and hit Start:

-
We've reached the final step! In the CSV destination file or destination of your choice you should see DropBox data:

Advanced topics
Create Custom Stored Procedure in ZappySys Driver
You can create procedures to encapsulate custom logic and then only pass handful parameters rather than long SQL to execute your API call.
Steps to create Custom Stored Procedure in ZappySys Driver. You can insert Placeholders anywhere inside Procedure Body. Read more about placeholders here
-
Go to Custom Objects Tab and Click on Add button and Select Add Procedure:

-
Enter the desired Procedure name and click on OK:

-
Select the created Stored Procedure and write the your desired stored procedure and Save it and it will create the custom stored procedure in the ZappySys Driver:
Here is an example stored procedure for ZappySys Driver. You can insert Placeholders anywhere inside Procedure Body. Read more about placeholders here
CREATE PROCEDURE [usp_get_orders] @fromdate = '<<yyyy-MM-dd,FUN_TODAY>>' AS SELECT * FROM Orders where OrderDate >= '<@fromdate>';

-
That's it now go to Preview Tab and Execute your Stored Procedure using Exec Command. In this example it will extract the orders from the date 1996-01-01:
Exec usp_get_orders '1996-01-01';

-
Let's generate the SQL Server Query Code to make the API call using stored procedure. Go to Code Generator Tab, select language as SQL Server and click on Generate button the generate the code.
As we already created the linked server for this Data Source, in that you just need to copy the Select Query and need to use the linked server name which we have apply on the place of [MY_API_SERVICE] placeholder.
SELECT * FROM OPENQUERY([LS_TO_DROPBOX_IN_GATEWAY], 'EXEC usp_get_orders @fromdate=''1996-07-30''')

-
Now go to SQL served and execute that query and it will make the API call using stored procedure and provide you the response.

Create Custom Virtual Table in ZappySys Driver
ZappySys API Drivers support flexible Query language so you can override Default Properties you configured on Data Source such as URL, Body. This way you don't have to create multiple Data Sources if you like to read data from multiple EndPoints. However not every application support supplying custom SQL to driver so you can only select Table from list returned from driver.
If you're dealing with Microsoft Access and need to import data from an SQL query, it's important to note that Access doesn't allow direct import of SQL queries. Instead, you can create custom objects (Virtual Tables) to handle the import process.
Many applications like MS Access, Informatica Designer wont give you option to specify custom SQL when you import Objects. In such case Virtual Table is very useful. You can create many Virtual Tables on the same Data Source (e.g. If you have 50 URLs with slight variations you can create virtual tables with just URL as Parameter setting.
-
Go to Custom Objects Tab and Click on Add button and Select Add Table:

-
Enter the desired Table name and click on OK:

-
And it will open the New Query Window Click on Cancel to close that window and go to Custom Objects Tab.
-
Select the created table, Select Text Type AS SQL and write the your desired SQL Query and Save it and it will create the custom table in the ZappySys Driver:
Here is an example SQL query for ZappySys Driver. You can insert Placeholders also. Read more about placeholders here
SELECT "ShipCountry", "OrderID", "CustomerID", "EmployeeID", "OrderDate", "RequiredDate", "ShippedDate", "ShipVia", "Freight", "ShipName", "ShipAddress", "ShipCity", "ShipRegion", "ShipPostalCode" FROM "Orders" Where "ShipCountry"='USA'

-
That's it now go to Preview Tab and Execute your custom virtual table query. In this example it will extract the orders for the USA Shipping Country only:
SELECT * FROM "vt__usa_orders_only"

-
Let's generate the SQL Server Query Code to make the API call using stored procedure. Go to Code Generator Tab, select language as SQL Server and click on Generate button the generate the code.
As we already created the linked server for this Data Source, in that you just need to copy the Select Query and need to use the linked server name which we have apply on the place of [MY_API_SERVICE] placeholder.
SELECT * FROM OPENQUERY([LS_TO_DROPBOX_IN_GATEWAY], 'EXEC [usp_get_orders] ''1996-01-01''')

-
Now go to SQL served and execute that query and it will make the API call using stored procedure and provide you the response.

Actions supported by DropBox Connector
DropBox Connector support following actions for REST API integration. If some actions are not listed below then you can easily edit Connector file and enhance out of the box functionality.| Parameter | Description | ||||||
|---|---|---|---|---|---|---|---|
| Path |
|
||||||
| Recursive |
|
| Parameter | Description |
|---|---|
| SourceFilePath |
|
| Parameter | Description |
|---|---|
| SourcePath |
|
| Parameter | Description |
|---|---|
| TargetFilePath |
|
| SourceFilePath |
|
| Parameter | Description |
|---|---|
| Path |
|
| Parameter | Description |
|---|---|
| Path |
|
| Parameter | Description | ||||||||||||||||||||||||||
|---|---|---|---|---|---|---|---|---|---|---|---|---|---|---|---|---|---|---|---|---|---|---|---|---|---|---|---|
| Url |
|
||||||||||||||||||||||||||
| Body |
|
||||||||||||||||||||||||||
| IsMultiPart |
|
||||||||||||||||||||||||||
| Filter |
|
||||||||||||||||||||||||||
| Headers |
|
| Parameter | Description |
|---|---|
| Url |
|
| IsMultiPart |
|
| Filter |
|
| Headers |
|
DropBox Connector Examples for UiPath Connection
This page offers a collection of SQL examples designed for seamless integration with the ZappySys API ODBC Driver under ODBC Data Source (36/64) or ZappySys Data Gateway, enhancing your ability to connect and interact with Prebuilt Connectors effectively.
Test connection [ Read more... ]
Tests connection
SELECT *
FROM make_testList folder #1 [ Read more... ]
Lists all files and folders within a folder
SELECT *
  FROM list_folder
List folder #2 [ Read more... ]
Lists all files and folders within a folder
SELECT *
  FROM list_folder
  WITH (Path='/MySubfolder'
       ,Recursive='true')
Download file [ Read more... ]
Downloads a file
SELECT *
  FROM download_file
  WITH (SourceFilePath='/file-I-want-to-download.dat'
        ,ResponseDataFile='C:\path\I\want\to\save\my\file\to.dat'
      )
Download folder as ZIP file [ Read more... ]
Downloads a folder with all files and folders within it as ZIP file
SELECT *
  FROM download_folder
  WITH (SourcePath='/folder-I-want-to-download'
        ,ResponseDataFile='C:\path\I\want\to\save\my\folder\to.zip'
      )
Upload a file [ Read more... ]
Uploads a file
SELECT *
  FROM upload_file
  WITH (TargetFilePath='/MySubfolder/file-I-want-to-upload-to-dropbox.dat'
        ,DiskFilePath='C:\file\I\want\to\upload.dat'
      )
Delete a file or a folder [ Read more... ]
Deletes a file or a folder
SELECT *
  FROM delete
  WITH (Path='/path/to/file/in/dropbox/I/want/to/delete.dat')
Create a folder [ Read more... ]
Creates a folder
SELECT *
  FROM create_folder
  WITH (Path='/folder/in/dropbox/I/want/to/create')
Conclusion
In this article we showed you how to connect to DropBox in UiPath and integrate data without any coding, saving you time and effort. It's worth noting that ZappySys API Driver allows you to connect not only to DropBox, but to any Java application that supports JDBC (just use a different JDBC driver and configure it appropriately).
We encourage you to download DropBox Connector for UiPath and see how easy it is to use it for yourself or your team.
If you have any questions, feel free to contact ZappySys support team. You can also open a live chat immediately by clicking on the chat icon below.
Download DropBox Connector for UiPath Documentation
More integrations
Other connectors for UiPath


 Connector")


 Connector")


 Connector")


Other application integration scenarios for DropBox
How to connect DropBox in UiPath?
How to get DropBox data in UiPath?
How to read DropBox data in UiPath?
How to load DropBox data in UiPath?
How to import DropBox data in UiPath?
How to pull DropBox data in UiPath?
How to push data to DropBox in UiPath?
How to write data to DropBox in UiPath?
How to POST data to DropBox in UiPath?
Call DropBox API in UiPath
Consume DropBox API in UiPath
DropBox UiPath Automate
DropBox UiPath Integration
Integration DropBox in UiPath
Consume real-time DropBox data in UiPath
Consume real-time DropBox API data in UiPath
DropBox ODBC Driver | ODBC Driver for DropBox | ODBC DropBox Driver | SSIS DropBox Source | SSIS DropBox Destination
Connect DropBox in UiPath
Load DropBox in UiPath
Load DropBox data in UiPath
Read DropBox data in UiPath
DropBox API Call in UiPath