How to integrate JSON with Power BI

Learn how to quickly and efficiently connect JSON with Power BI for smooth data access.
Read and write JSON data effortlessly. Extract, filter, and sync JSON from URLs, strings, and local files for analytics, reporting, and data pipelines — almost no coding required. You can do it all using the high-performance JSON ODBC Driver. We'll walk you through the entire setup.
Ready to dive in? Download the product to jump right in, or follow the step-by-step guide below to see how it works.
Video tutorial
Watch this quick video to see the integration in action. It walks you through the end-to-end setup, including:
- Installing the ODBC PowerPack
- Working with JSON data directly inside Power BI
- Exploring advanced JSON Driver features

Once you are done watching, simply follow the step-by-step written guide below to configure your data source.
Create data source using JSON ODBC Driver
Step-by-step instructions
To get data from JSON using Power BI, we first need to create an ODBC data source. We will later read this data in Power BI. Perform these steps:
-
Download and install ODBC PowerPack (if you haven't already).
-
Search for
odbcand open the ODBC Data Sources (64-bit):
-
Create a User data source (User DSN) based on the ZappySys JSON Driver driver:
ZappySys JSON Driver
- Create and use a User DSN if the client application runs under a User Account. This is the ideal option at design time (e.g., when developing in Visual Studio). Use it for both types of applications (64-bit and 32-bit).
- Create and use a System DSN if the client application runs under a System Account (e.g., as a Windows Service). This is usually the required option in a production environment. If your Windows Service is a 32-bit application, you must use the 32-bit ODBC Data Source Administrator to configure this
When deployed to production, Power BI runs under a Service Account. Therefore, for the production environment, you must create and use a System DSN. -
Select Url or File and paste the following Url for this example OR you can load existing connection string as per this article.
NOTE: Here for demo, We are using odata API, but you need to refer your own API documentation and based on that you need to use your own API URL and need to configure connection based on API Authentication type
-
Now enter JSONPath expression in Array Filter textbox to extract only specific part of JSON file as below ($.value[*] will get content of value attribute from JSON document. Value attribute is array of JSON documents so we have to use [*] to indicate we want all records of that array)
NOTE: Here, We are using our desired filter, but you need to select your desired filter based on your requirement.
Click on Test Connection button to view whether the Test Connection is SUCCESSFUL or Not.$.value[*]
-
Once you configured a data source, you can preview data. Hit Preview tab, and use similar settings to preview data:

-
Click OK to finish creating the data source
-
That's it; we are done. In a few clicks we configured the call to JSON API using ZappySys JSON Connector.
Connect to JSON data in Power BI
Import data from a table or view
-
Once you open Power BI Desktop click Get Data to get data from ODBC:

-
A window opens, and then search for "odbc" to get data from ODBC data source:

-
Another window opens and asks to select a Data Source we already created. Choose JsonDSN and continue:
JsonDSN
-
Most likely, you will be asked to authenticate to a newly created DSN. Just select Windows authentication option together with Use my current credentials option:
JsonDSN
-
Finally, you will be asked to select a table or view to get data from. Select one and load the data!

-
Finally, finally, read extracted data from JSON in a Power BI report:

Import data using a SQL query
If you wish to import JSON data from SQL query rather than a table then you can use advanced options during import steps (as below). After selecting DSN you can click on advanced options to see SQL Query editor.
            SELECT
                ProductID,
                ProductName,
                SupplierID,
                CategoryID,
                QuantityPerUnit,
                UnitPrice
            FROM _root_
            WHERE UnitPrice > 20

$ as the table name, e.g., SELECT * FROM $.
Use _root_ instead, e.g., SELECT * FROM _root_.
Publish Power BI report to Power BI service
Here are the instructions on how to publish a Power BI report to Power BI service from Power BI Desktop application:
-
First of all, go to Power BI Desktop, open a Power BI report, and click Publish button:

-
Then select the Workspace you want to publish report to and hit Select button:

-
Finally, if everything went right, you will see a window indicating success:

What's next? If you need to periodically refresh Power BI semantic model (dataset) to ensure data accuracy and up-to-dateness, you can accomplish that by using Microsoft On-premises data gateway. Proceed to the next section - Refresh the Power BI semantic model via the gateway - and learn how to do that.
Refresh the Power BI semantic model (dataset) via the gateway
Power BI allows you to refresh semantic models (previously known as "datasets") that are based on data sources residing on-premises. This is achieved using the Microsoft On-premises data gateway. It acts as a secure bridge between Power BI cloud services and your local JSON ODBC data source:

There are two types of On-premises data gateways:
- Supports Power BI and other Microsoft Cloud services
- Installs as a Windows service
- Starts automatically
- Supports centralized user access control
- Supports the
Direct Queryfeature - Ideal for enterprise solutions
- Supports Power BI services only
- Cannot run as a Windows service
- Stops when you sign out of Windows
- Does not support access control
- Does not support the
Direct Queryfeature - Best for individual use and POC solutions
You can download the On-premises data gateway directly from the Microsoft Fabric or Power BI portals:

Below are instructions on how to refresh the semantic model using both gateway types.
Use the Standard mode gateway (recommended)
Best for enterprise production environments where multiple users need to share the same gateway connection.
Follow these steps to refresh a Power BI semantic model using the On-premises data gateway (Standard mode):
-
Go to Power BI My workspace, hover your mouse cursor over your semantic model, and click Settings:

-
If you see this view, it means you must install the On-premises data gateway (Standard mode):

-
Download On-premises data gateway (standard mode) and run the installer.
-
Once the configuration window opens, sign in:
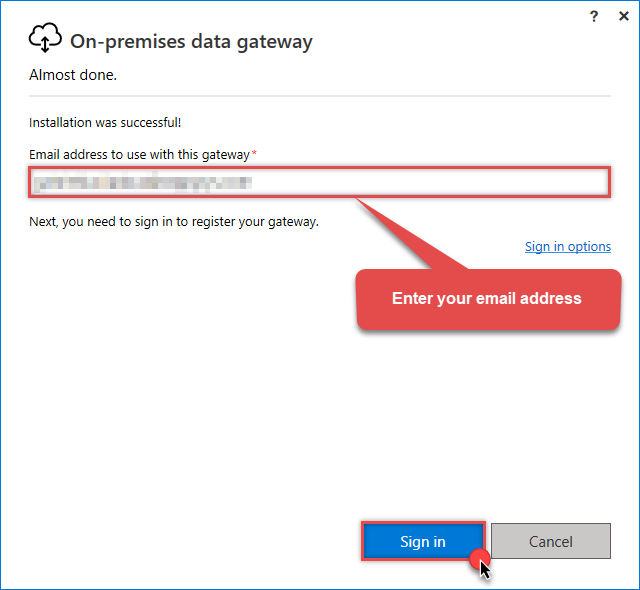 Sign in with the same email address you use for Microsoft Fabric.
 -
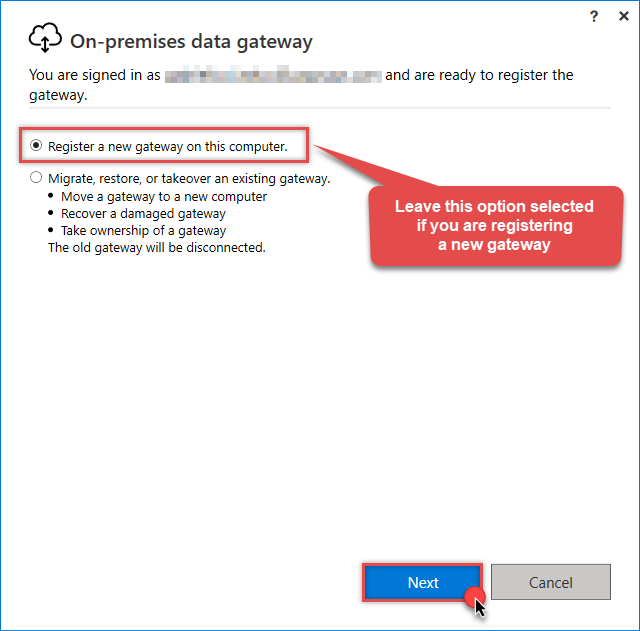
Select Register a new gateway on this computer (or migrate an existing one):
-
Name your gateway, enter a Recovery key, and click the Configure button:
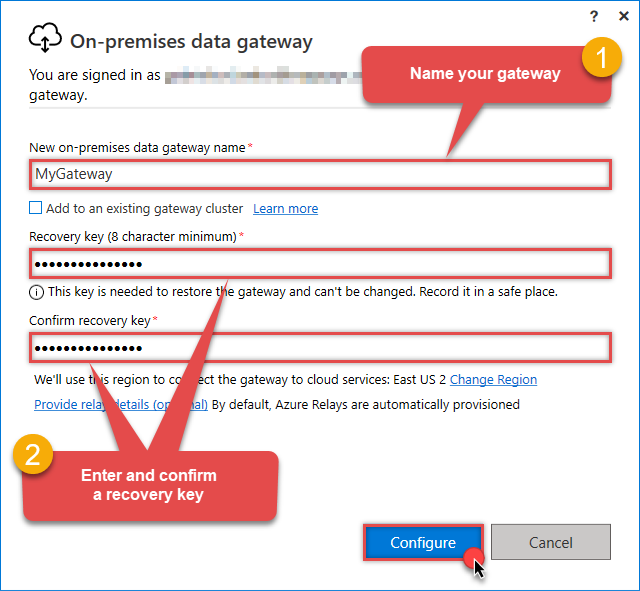 Save your Recovery Key in a safe place (like a password manager). If you lose it, you cannot restore or migrate this gateway later.
 -
Once Microsoft gateway is installed, check if it registered correctly:
-
Go back to Power BI portal
-
Click Gear icon on top-right
-
And then hit Manage connections and gateways menu item

-
-
Continue by clicking the On-premises data gateway tab and selecting Standard mode gateways from the dropdown menu:

If your gateway is not listed, the registration may have failed. To resolve this:
- Wait a couple of minutes and refresh Power BI portal page
- Restart the machine where On-premises data gateway is installed
- Check firewall settings
-
Success! The gateway is now Online and ready to handle requests.
-
Now, return to your semantic model settings in the Power BI portal. Refresh the page, and you should see your newly created gateway. Click the arrow icon to expand the options, and then click the Add to gateway link:
ODBC{"connectionstring":"dsn=JsonDSN"}
-
Once you do that, you will create a new gateway connection. Give it a name, set the Authentication method, Privacy level, and click the Create button:
dsn=JsonDSN In this example, we use the least restrictive Privacy level.
If your connection uses a full connection string, you may hit a length limitation when entering it into the field. To create the connection, you will need to shorten it manually. Check the section about the limitation of a full connection string on how to accomplish this.
On-premises data gateway (Personal mode) does not have this limitation.
-
Select the newly created connection to map it to your dataset:
ODBC{"connectionstring":"dsn=JsonDSN"}
-
Finally, you can refresh the semantic model:

Use the Personal mode gateway (POC)
Best for single-user scenarios, quick tests (POC), or when you don't have administrative rights to install the Standard gateway.
Follow these steps to refresh a Power BI semantic model using the On-premises data gateway (Personal mode):
-
Go to Power BI My workspace, hover your mouse cursor over your semantic model, and click Settings:
-
If you see this view, it means you must install the On-premises data gateway (Personal mode):
-
Install On-premises data gateway (personal mode) and sign-in:
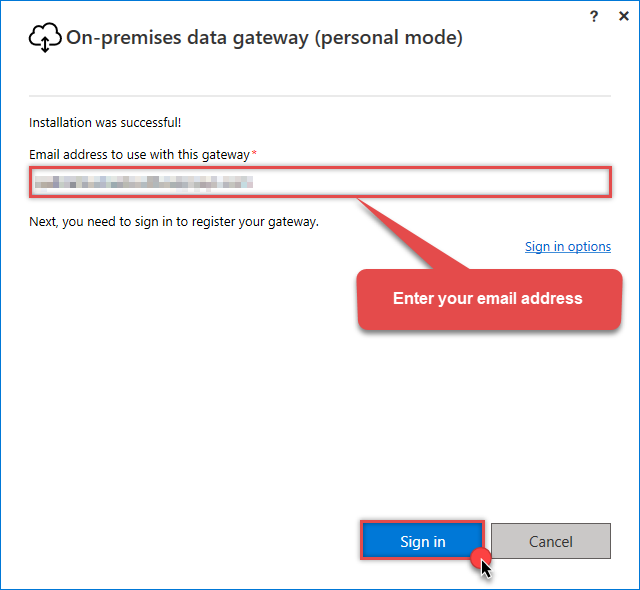 Use the same email address you use when logging in into your account.
 -
Once Microsoft gateway is installed, check if it registered correctly:
-
Go back to Power BI portal
-
Click Gear icon on top-right
-
And then hit Manage connections and gateways menu item
-
-
Continue by clicking On-premises data gateway tab and select Personal mode option from the dropdown:

If your gateway is not listed, the registration may have failed. To resolve this:
- Wait a couple of minutes and refresh Power BI portal page
- Restart the machine where On-premises data gateway is installed
- Check firewall settings
-
The On-premises data gateway is now Online and ready to receive requests.
-
Return to your semantic model Settings, expand Data source credentials, click Edit credentials, select the Authentication method and the Privacy level, and then click the Sign in button:
dsn=JsonDSN
-
Finally, you are ready to refresh your semantic model:
Advanced topics
Editing query in Power BI
There will be a time you need to change the initial query after importing data into Power BI. Don't worry, just right-click on your table and click Edit query menu item:

Using parameters for dynamic queries
In the real world, many values of your REST / SOAP API call may be coming from parameters. If that's the case for you can try to edit script manually as below. In below example its calling SQL Query with POST method and passing some parameters. Notice below where paraAPIKey is Power BI Parameter (string type). You can use parameters anywhere in your script just like the normal variable.
To use a parameter in Power BI report, follow these simple steps:
-
Firstly, you need to Edit query of your table (see previous section)
-
Then just create a new parameter by clicking Manage Parameters dropdown, click New Parameter option, and use it in the query:
                            = Odbc.Query("dsn=JsonDSN",
                                         "SELECT * FROM _root_
                                          WITH (SRC='http://my-api-provider.com/api/" & MyParameter & "/items')")
Refer to Power Query M reference for more information on how to use its advanced features in your queries.
Using DirectQuery (live connection)
By default, Power BI imports JSON data into its internal cache. However, if you require real-time data, you can use the DirectQuery mode.
Since the native Power BI ODBC connector limits you to Import mode,
we must bridge the connection via Microsoft SQL Server.
To do this, we configure the ZappySys Data Gateway
and create a Linked Server pointing to it:

Follow these steps to use DirectQuery:
-
Configure ZappySys Data Gateway and create a Linked Server in SQL Server.
-
Once the Linked Server is ready, open Power BI Desktop.
-
Click Get Data and select SQL Server.
-
Enter your SQL Server instance name and a valid database name (e.g.,
master). -
Under Data Connectivity mode, select DirectQuery.
-
Expand Advanced options and enter your SQL query using the
OPENQUERYsyntax below (replace[LINKED_SERVER_NAME]with your actual Linked Server name):SELECT * FROM OPENQUERY([LS_TO_JSON_IN_GATEWAY], 'SELECT * FROM Orders')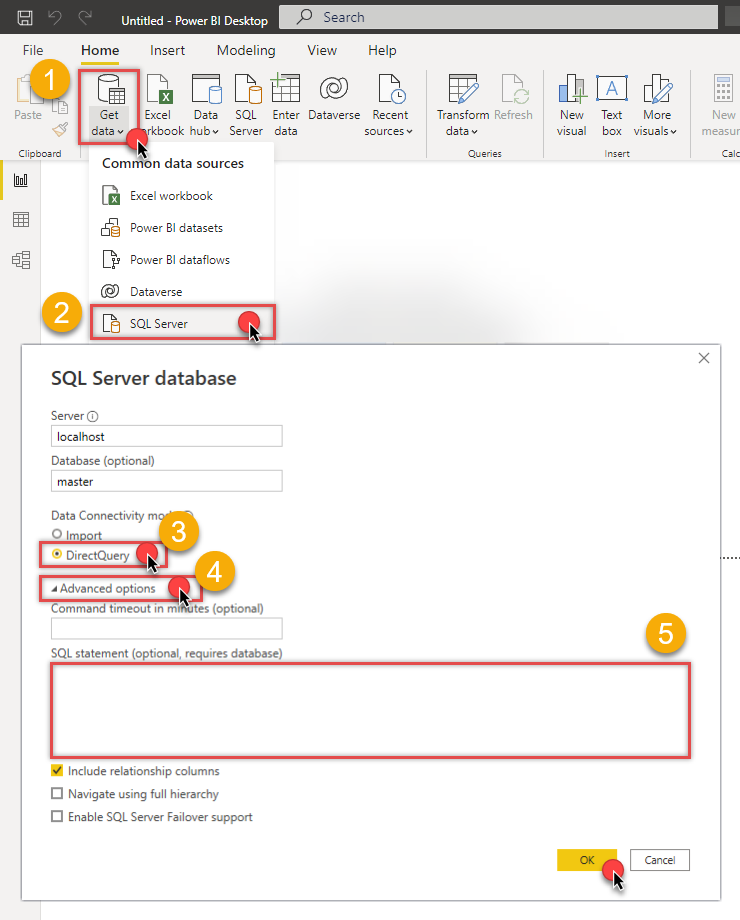
SELECT * FROM OPENQUERY([LS_TO_JSON_IN_GATEWAY], 'SELECT * FROM Orders') - Click OK and load the data. Your JSON data is now linked live rather than imported.
DirectQuery unless it is required for very large datasets or real-time data needs.
Data is fetched on demand, which can impact performance compared to the cached Import mode.
Using full ODBC connection string
In the previous steps we used a very short format of ODBC connection string - a DSN. Yet sometimes you don't want a dependency on an ODBC data source (and an extra step). In those times, you can define a full connection string and skip creating an ODBC data source entirely. Let's see below how to accomplish that in the below steps:
-
Open ODBC data source configuration and click Copy settings:
ZappySys JSON Driver - JSONRead and write JSON data effortlessly. Extract, filter, and sync JSON from URLs, strings, and local files for analytics, reporting, and data pipelines — almost no coding required.JsonDSN

-
The window opens, telling us the connection string was successfully copied to the clipboard:

-
Then just paste the connection string into your script:
JsonDSNDRIVER={ZappySys JSON Driver};DataPath='http://services.odata.org/V3/Northwind/Northwind.svc/Products?$format=json';Filter='$.value[*]';RequestHeaders='Accept: application/json;odata=verbose'

- You are good to go! The script will execute the same way as using a DSN.
Have in mind that a full connection string has length limitations.
Proceed to the next step to find out the details.
Handling limitations of using a full connection string
Despite using a full ODBC connection string may be very convenient it comes with a limitation: it's length is limited to 1024 symbols (or sometimes more). It usually happens when API provider generates a very long Refresh Token when OAuth is at play. If you are using such a long ODBC connection string, you may get this error:
"Connection string exceeds maximum allowed length of 1024"But there is a solution to this by storing the full connection string in a file. Follow the steps below to achieve this:
- Open your ODBC data source.
- Click Copy settings button to copy a full connection string (see the previous section on how to accomplish that).
- Then create a new file, let's say, in C:\temp\odbc-connection-string.txt.
- Continue by pasting the copied connection string into a newly created file and save it.
-
Finally, the last step! Just construct a shorter ODBC connection string using this format:
DRIVER={ZappySys JSON Driver};SettingsFile=C:\temp\odbc-connection-string.txt - Our troubles are over! Now you should be able to use this connection string in Power BI with no problems.
Optional: Centralized data access via ZappySys Data Gateway
In some situations, you may need to provide JSON data access to multiple users or services. Configuring the data source on a Data Gateway creates a single, centralized connection point for this purpose.
This configuration provides two primary advantages:
-
Centralized data access
The data source is configured once on the gateway, eliminating the need to set it up individually on each user's machine or application. This significantly simplifies the management process.
-
Centralized access control
Since all connections route through the gateway, access can be governed or revoked from a single location for all users.
| Data Gateway |
Local ODBC
data source
|
|
|---|---|---|
| Simple configuration | ||
| Installation | Single machine | Per machine |
| Connectivity | Local and remote | Local only |
| Connections limit | Limited by License | Unlimited |
| Central data access | ||
| Central access control | ||
| More flexible cost |
To achieve this, you must first create a data source in the Data Gateway (server-side) and then create an ODBC data source in Power BI (client-side) to connect to it.
Let's not wait and get going!
Create JSON data source in the gateway
In this section we will create a data source for JSON in the Data Gateway. Let's follow these steps to accomplish that:
-
Search for
gatewayin the Windows Start Menu and open ZappySys Data Gateway Configuration:
-
Go to the Users tab and follow these steps to add a Data Gateway user:
- Click the Add button
-
In the Login field enter a username, e.g.,
john - Then enter a Password
- Check the Is Administrator checkbox
- Click OK to save

-
Now we are ready to add a data source:
- Click the Add button
- Give the Data source a name (have it handy for later)
- Then select Native - ZappySys JSON Driver
- Finally, click OK
JsonDSNZappySys JSON Driver
-
When the ZappySys JSON Driver configuration window opens, go back to ODBC Data Source Administrator where you already have the JSON ODBC data source created and configured, and follow these steps on how to Import data source configuration into the Gateway:
-
Open ODBC data source configuration and click Copy settings:
ZappySys JSON Driver - JSONRead and write JSON data effortlessly. Extract, filter, and sync JSON from URLs, strings, and local files for analytics, reporting, and data pipelines — almost no coding required.JsonDSN
-
The window opens, telling us the connection string was successfully copied to the clipboard:
-
Then go to Data Gateway configuration and in data source configuration window click Load settings:
JsonDSN
ZappySys JSON Driver - Configuration [Version: 2.0.1.10418]ZappySys JSON Driver - JSONRead and write JSON data effortlessly. Extract, filter, and sync JSON from URLs, strings, and local files for analytics, reporting, and data pipelines — almost no coding required.JsonDSN
-
Once a window opens, just paste the settings by pressing
CTRL+Vor by clicking right mouse button and then Paste option.
-
Open ODBC data source configuration and click Copy settings:
-
Once done, go to the Network Settings tab and Add a firewall rule for inbound traffic:

- This will initially allow all inbound traffic.
- Click Edit IP filters to restrict access to specific IP addresses or ranges.
-
Crucial Step: After creating or modifying the data source, you must:
- Click the Save button to persist your changes.
- Hit Yes when prompted to restart the Data Gateway service.
This ensures all changes are properly applied:
 Skipping this step may cause the new settings to fail, preventing you from connecting to the data source.
Create ODBC data source to connect to the gateway
In this part we will create an ODBC data source to connect to the ZappySys Data Gateway from Power BI. To achieve that, let's perform these steps:
-
Search for
odbcand open the ODBC Data Sources (64-bit):
-
Create a User data source (User DSN) based on the ODBC Driver 17 for SQL Server driver:
ODBC Driver 17 for SQL Server
If you don't see the ODBC Driver 17 for SQL Server driver in the list, choose a similar version. -
Then set a Name for the data source (e.g.
Gateway) and the address of the Data Gateway:ZappySysGatewayDSNlocalhost,5000 Make sure you separate the hostname and port with a comma, e.g.
localhost,5000. -
Proceed with the authentication part:
- Select SQL Server authentication
-
In the Login ID field enter the user name you created in the Data Gateway, e.g.,
john - Set Password to the one you configured in the Data Gateway

-
Then set the default database property to
JsonDSN(the one we used in the Data Gateway):JsonDSNJsonDSN Make sure to type the data source name manually or copy/paste it directly into the field. Using the dropdown might fail because the Trust server certificate option is not enabled yet (next step).
 -
Continue by checking the Trust server certificate option:

-
Once you do that, test the connection:

-
If the connection is successful, everything is good:

-
Done!
We are ready to move to the final step. Let's do it!
Access data in Power BI via the gateway
Finally, we are ready to read data from JSON in Power BI via the Data Gateway. Follow these final steps:
-
Go back to Power BI.
-
Once you open Power BI Desktop click Get Data to get data from ODBC:
-
A window opens, and then search for "odbc" to get data from ODBC data source:
-
Another window opens and asks to select a Data Source we already created. Choose ZappySysGatewayDSN and continue:
ZappySysGatewayDSN
-
When the ODBC driver authentication window opens, configure the following:
-
Enter the User name (e.g.,
john) - Enter the Password that you configured in ZappySys Data Gateway
- Hit the Connect button
dsn=ZappySysGatewayDSN Make sure the Database tab is selected; otherwise, Power BI won't be able to connect to the ZappySys Data Gateway.
 -
Enter the User name (e.g.,
-
Read the data the same way we discussed at the beginning of this article.
-
That's it!
Now you can connect to JSON data in Power BI via the ZappySys Data Gateway.
Configuring pagination in the JSON Driver
ZappySys JSON Driver equips users with powerful tools for seamless data extraction and management from REST APIs, leveraging advanced pagination methods for enhanced efficiency. These options are designed to handle various types of pagination structures commonly used in APIs. Below are the detailed descriptions of these options:
Page-based Pagination: This method works by retrieving data in fixed-size pages from the Rest API. It allows you to specify the page size and navigate through the results by requesting different page numbers, ensuring that you can access all the data in a structured manner.
Offset-based Pagination: With this approach, you can extract data by specifying the starting point or offset from which to begin retrieving data. It allows you to define the number of records to skip and fetch subsequent data accordingly, providing precise control over the data extraction process.
Cursor-based Pagination: This technique involves using a cursor or a marker that points to a specific position in the dataset. It enables you to retrieve data starting from the position indicated by the cursor and proceed to subsequent segments, ensuring that you capture all the relevant information without missing any records.
Token-based Pagination: In this method, a token serves as a unique identifier for a specific data segment. It allows you to access the next set of data by using the token provided in the response from the previous request. This ensures that you can systematically retrieve all the data segments without duplication or omission.
Utilizing these comprehensive pagination features in the ZappySys JSON Driver facilitates efficient data management and extraction from REST APIs, optimizing the integration and analysis of extensive datasets.
For more detailed steps, please refer to this link: How to do REST API Pagination in SSIS / ODBC Drivers
Authentication
ZappySys offers various authentication methods to securely access data from various sources. These authentication methods include OAuth, Basic Authentication, Token-based Authentication, and more, allowing users to connect to a wide range of data sources securely.
ZappySys Authentication is a robust system that facilitates secure access to data from a diverse range of sources. It includes a variety of authentication methods tailored to meet the specific requirements of different data platforms and services. These authentication methods may involve:
OAuth: ZappySys supports OAuth for authentication, which allows users to grant limited access to their data without revealing their credentials. It's commonly used for applications that require access to user account information.
Basic Authentication: This method involves sending a username and password with every request. ZappySys allows users to securely access data using this traditional authentication approach.
Token-based Authentication: ZappySys enables users to utilize tokens for authentication. This method involves exchanging a unique token with each request to authenticate the user's identity without revealing sensitive information.
By implementing these authentication methods, ZappySys ensures the secure and reliable retrieval of data from various sources, providing users with the necessary tools to access and integrate data securely and efficiently. For more comprehensive details on the authentication process, please refer to the official ZappySys documentation or reach out to their support team for further assistance.
For more details, please refer to this link: ZappySys Connections
Conclusion
In this article we showed you how to connect to JSON in Power BI and integrate data without writing complex code — all of this was powered by JSON ODBC Driver.
Download ODBC PowerPack now or ping us via chat if you have any questions or are looking for a specific feature (you can also reach out to us by submitting a ticket):


 Connector")


 Connector")


 Connector")


 Connector")


