Write data to OneDrive using SSIS (Import data)
In this section we will learn how to configure and use OneDrive Connector in the API Destination to write data to OneDrive.
Video tutorial
This video covers following and more so watch carefully. After watching this video follow the steps described in this article.
- How to download SSIS PowerPack for
OneDrive integration in SSIS - How to configure connection for
OneDrive - How to write or lookup data to
OneDrive - Features about SSIS API Destination
- Using
OneDrive Connector in SSIS
Step-by-step instructions
In upper section we learned how to read data, now in this section we will learn how to configure OneDrive in the API Source to POST data to the OneDrive.
-
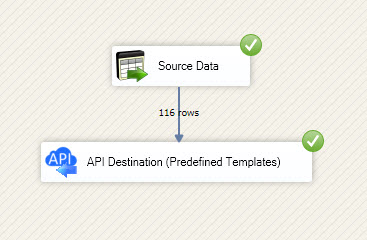
Read the data from the source, being any desired source component. In example we will use ZappySys Dummy Data Source component.
-
From the SSIS Toolbox drag and drop API Destination (Predefined Templates) on the Data Flow Designer surface and connect source component with it, and double click to edit it.
 - Drag and Drop")
-
Select New Connection to create a new connection:
API Destination - OneDriveOneDrive Connector can be used to integrate OneDrive and your defined data source, e.g. Microsoft SQL, Oracle, Excel, Power BI, etc. Get, write, delete OneDrive data in a few clicks!

-
Use a preinstalled OneDrive Connector from Popular Connector List or press Search Online radio button to download OneDrive Connector. Once downloaded simply use it in the configuration:
OneDrive
-
Proceed with selecting the desired Authentication Type. Then select API Base URL (in most cases default one is the right one). Finally, fill in all the required parameters and set optional parameters if needed. You may press a link Steps to Configure which will help set certain parameters. More info is available in Authentication section.
Use delegated access (User Credentials) whenever you want to let a signed-in user work with their own resources or resources they can access. Whether it's an admin setting up policies for their entire organization or a user deleting an email in their inbox, all scenarios involving user actions should use delegated access. [API reference]
Steps how to get and use OneDrive credentials
Follow these simple steps below to create Microsoft Entra ID application with delegated access:
WARNING: To automate your company's processes, make sure you use a system/generic account (e.g.automation@my-company.com). When you use a personal account which is tied to a specific employee profile and that employee leaves the company, the token may become invalid and any automated processes using that token will start to fail.- Navigate to the Azure Portal and log in using your credentials.
- Access Microsoft Entra ID.
-
Register a new application by going to
App registrations
and clicking on New registration button:
 INFO: Find more information on how to register an application in Graph API reference.
 -
When configuration window opens, configure these fields:
-
Supported account type
- Use
Accounts in this organizational directory only, if you need access to data in your organization only.
- Use
-
Supported account type
-
Redirect URI:
- Set the type to
Public client/native (mobile & desktop). - Use
https://zappysys.com/oauthas the URL.
- Set the type to
-
After registering the app, copy the Application (client) ID for later:

-
Then copy OAuth authorization endpoint (v2) & OAuth token endpoint (v2) URLs to use later in the configuration:

-
Now go to SSIS package or ODBC data source and use the copied values in User Credentials authentication configuration:
- In the Authorization URL field paste the OAuth authorization endpoint (v2) URL value you copied in the previous step.
- In the Token URL field paste the OAuth token endpoint (v2) URL value you copied in the previous step.
- In the Client ID field paste the Application (client) ID value you copied in the previous step.
-
In the Scope field use the default value or select individual scopes, e.g.:
-
email -
offline_access -
openid -
profile -
User.Read -
Files.Read.All -
Files.ReadWrite.All
-
- Press Generate Token button to generate Access and Refresh Tokens.
- Optional step. Choose Default Site Id from the drop down menu.
- Click Test Connection to confirm the connection is working.
- Done! Now you are ready to use the API Connector!

Fill in all required parameters and set optional parameters if needed:
OnedriveDSNOneDriveUser Credentials [OAuth]https://graph.microsoft.com/v1.0Required Parameters Authorization URL Fill-in the parameter... Token URL Fill-in the parameter... Client ID Fill-in the parameter... Scope Fill-in the parameter... Optional Parameters Client Secret Refresh Token File Path Return URL https://zappysys.com/oauth Default Group or User Id (additional Scopes needed to list - If fails enter manually) Default Drive Id (Select after clicking **Generate Token**) me RetryMode RetryWhenStatusCodeMatch RetryStatusCodeList 429|503|423 RetryCountMax 5 RetryMultiplyWaitTime True Login Prompt Option Search Option For Non-Indexed Fields (Default=Blank - Search Only Indexed) Extra Headers (e.g. Header1:AAA||Header2:BBB) IsAppCred 0 
Application-only access is broader and more powerful than delegated access (User Credentials), so you should only use app-only access where needed. Use it when: 1. The application needs to run in an automated way, without user input (for example, a daily script that checks emails from certain contacts and sends automated responses). 2. The application needs to access resources belonging to multiple different users (for example, a backup or data loss prevention app might need to retrieve messages from many different chat channels, each with different participants). 3. You find yourself tempted to store credentials locally and allow the app to sign in 'as' the user or admin. [API reference]
Steps how to get and use OneDrive credentials
Follow these simple steps below to create Microsoft Entra ID application with application access permissions. Using following steps, you can grant very granular app permissions to access Full site(s), List(s), List Item(s) and File(s). Choose permission based on your need.
Create OAuth app
- Navigate to the Azure Portal and log in using your credentials.
- Access Microsoft Entra ID.
-
Register a new application by going to
App registrations
and clicking on New registration button:
INFO: Find more information on how to register an application in Graph API reference.
-
When configuration window opens, configure these fields:
-
Supported account type
- e.g. select
Accounts in this organizational directory onlyif you need access to data in your organization only.
- e.g. select
-
Supported account type
-
Redirect URI:
- Set the type to
Public client/native (mobile & desktop). - Leave the URL field empty.
- Set the type to
-
After registering the app, copy the Application (client) ID for later:
-
Then copy OAuth authorization endpoint (v2) & OAuth token endpoint (v2) URLs:
-
Continue and create Client secret:

-
Then copy the Client secret for later steps:

-
Continue by adding permissions for the app by going to the API permissions section, and clicking on Add a permission:

-
Select Microsoft Graph:

-
Then choose Application permissions option:

-
Continue by adding these Files (OneDrive) permissions (Just search for "Site" and then select desired permissions):

-
Move on by addding these Sites (SharePoint) permissions (You can search for "Site" and then select desired permissions):

-
Finish by clicking Add permissions button:

-
Now it's time to Grant admin consent for your application:

-
Confirm all the permissions are granted:

-
Now go to SSIS package or ODBC data source and use the copied values in Application Credentials authentication configuration:
- In the Token URL field paste the OAuth token endpoint (v2) URL value you copied in the previous step.
- In the Client ID field paste the Application (client) ID value you copied in the previous step.
- In the Client Secret field paste the Client secret value you copied in the previous step.
- Optional step. Choose Default Site Id from the drop down menu.
- Click Test Connection to confirm the connection is working.
- Done! Let's move on to the next step.
Step-2 (Method#1 - New Approach): Grant permission to app using permission API (UI is not available yet)
In year 2024 microsoft launched
*.Selected
permission scopes and new APIs to grant granular permissions to the resource for app access scenario. Unfortunatly, there is no User interface available yet to control this access so you have to call Admin API or use PowerShell script to control this. [Click here to learn more]. Follow these simple steps to configure permissions for app we created earlier (steps assume you are the owner of the resource and like to grant some permissions e.g. read, write, full, owner):- Open PowerShell (Run as Admin user)
- Install Graph API module by running this command
Import-Module Microsoft.Graph.Sites - Now you can call following PowerShell code to set "read" and "write" permission for the app we created earlier (assuming app id is 89ea5c94-7736-4e25-95ad-3fa95f62b66e).
#More info https://learn.microsoft.com/en-us/graph/permissions-selected-overview?tabs=powershell

#Step-1: Install module if not found
#Install-Module Microsoft.Graph.Sites

#Step-2: set permission for app 89xxx6e and site zappysys.xx.efcdd21xxxxe2
Import-Module Microsoft.Graph.Sites

#Step-3: Login
Connect-MgGraph

#Step-4: Set Parameters for API Call (set Permissions, SiteId and AppId - Replace under #TODO)

You can find SiteId by visiting this URL in browser (assuming you visted SharePoint site and already logged in) https://{your-company}.sharepoint.com/_api/site --OR-- for sub-site use https://{your-company}.sharepoint.com/sites/{your-site}/_api/site. Find  Id from the response (e.g. <Id m:type="Edm.Guid">)
$siteId="yourcompany.sharepoint.com,efcddxxxxxxx104d8b5e3,8c9c6xxxxxxxx84e2"
#--OR-- simple id
#$siteId="efcddxxxxxxx104d8b5e3"


$params = @{
	roles = @(
        #possible options are read, write, fullcontrol, owner (write includes read too)
		#TODO: Change here
		"write"
	)
	grantedTo = @{
		application = @{
            #find this Client Id (Application Id) from the Azure Portal - Application page (https://portal.azure.com/#view/Microsoft_AAD_RegisteredApps/ApplicationsListBlade)
			#TODO: Change here
			id = "c3e9xxxxxx-xxxxx-xxxxx-xxxx-xxxxxb30c1"
		}
	}
}

#Step-5: Grant Permission
New-MgSitePermission -SiteId $siteId -BodyParameter $params
Fill in all required parameters and set optional parameters if needed:
OnedriveDSNOneDriveApplication Credentials [OAuth]https://graph.microsoft.com/v1.0Required Parameters Token URL Fill-in the parameter... Client ID Fill-in the parameter... Client Secret Fill-in the parameter... Default Group or User Id (additional Scopes needed to list - If fails enter manually) Fill-in the parameter... Default Drive Id Fill-in the parameter... Optional Parameters Scope https://graph.microsoft.com/.default RetryMode RetryWhenStatusCodeMatch RetryStatusCodeList 429|503|423 RetryCountMax 5 RetryMultiplyWaitTime True Search Option For Non-Indexed Fields (Default=Blank - Search Only Indexed) Extra Headers (e.g. Header1:AAA||Header2:BBB) IsAppCred 1
Steps how to get and use OneDrive credentials
To use Certificate-Based Authentication Setup please follow the steps listed in [Application Credentials] authentication and once done come back here to finish next stsps.This guide walks you through setting up a certificate-based authentication flow for Microsoft Graph or other Azure AD protected APIs using client credentials and a JWT.
Step 1: Generate a Self-Signed Certificate
You can use OpenSSL or any other way to generate Certificate file but make it simple below example uses PowerShell. Open PowerShell and execute code listed in below steps.# Run this in PowerShell #Change .AddYears(1) to desired number. By default it expires certificate in one year as per below code. $cert = New-SelfSignedCertificate ` -Subject "CN=MyClientAppCert" ` -KeySpec Signature ` -KeyExportPolicy Exportable ` -KeyLength 2048 ` -CertStoreLocation "Cert:\CurrentUser\My" ` -KeyAlgorithm RSA ` -HashAlgorithm SHA256 ` -NotAfter (Get-Date).AddYears(1) ` -Provider "Microsoft Enhanced RSA and AES Cryptographic Provider" # Export private key (.pfx) - Keep this with you to make API calls (SECRET KEY - DONOT SHARE) $pfxPath = "$env:USERPROFILE\Desktop\private_key.pfx" $pwd = ConvertTo-SecureString -String "yourStrongPassword123" -Force -AsPlainText Export-PfxCertificate -Cert $cert -FilePath $pfxPath -Password $pwd # Export public certificate (.cer) - UPLOAD this to Azure Portal $cerPath = "$env:USERPROFILE\Desktop\public_key.cer" Export-Certificate -Cert $cert -FilePath $cerPathStep 2: Register or Configure an App in Azure AD
- Go to https://portal.azure.com
- Navigate to Azure Active Directory > App registrations
- Click + New registration or open an existing app
- Copy the Application (client) ID and Directory (tenant) ID
Step 3: Upload the Certificate
- In your App Registration, go to Certificates & secrets
- Under Certificates, click Upload certificate
- Select the
.cerfile (public certificate) - Click Add
Step 4: Grant API Permissions
- Go to the API permissions tab
- Click Add a permission
- Select Microsoft Graph (or another API)
- Choose Application permissions
- Add scopes such as:
-
Sites.Read.All -
Sites.ReadWrite.All -
Files.Read.All -
Files.ReadWrite.All -
email -
offline_access -
openid -
profile -
User.Read
-
- Click Grant admin consent (requires admin)
Step 5: Use PFX file
Once both files generated perform the following steps to use PFX file., , Use the Certificate file (*.pfx) Now its time to use pfx file generated in the previous step. PFX file contains private key and public key both.- On ZappySys Connection UI Go to
Certificate Tab - Change Storage Mode to Local PFX File (or you can Import PFX file in Certificate Storage - User Store / Machine Store and use that way)
- Supply the pfx file path or select certificate from Local Certificate Store if you imported that way in earlier step
- Supply the certificate password (same password used in earlier PowerShell script)
- Test connection see everything is good
Fill in all required parameters and set optional parameters if needed:
OnedriveDSNOneDriveApplication Credentials with Certificate (Sign JWT with Private Key) [OAuth]https://graph.microsoft.com/v1.0Required Parameters Token URL Fill-in the parameter... Client ID Fill-in the parameter... Certificate: *** Configure [Client Certificate] Tab *** Fill-in the parameter... Default Site Id Fill-in the parameter... Optional Parameters Default Drive Id RetryMode RetryWhenStatusCodeMatch RetryStatusCodeList 429|503|423 RetryCountMax 5 RetryMultiplyWaitTime True Search Option For Non-Indexed Fields (Default=Blank - Search Only Indexed) Extra Headers (e.g. Header1:AAA||Header2:BBB) IsAppCred 1
-
Select the desired endpoint, change/pass the properties values, and go to the Mappings tab to map the columns.
API Destination - OneDriveOneDrive Connector can be used to integrate OneDrive and your defined data source, e.g. Microsoft SQL, Oracle, Excel, Power BI, etc. Get, write, delete OneDrive data in a few clicks!

-
Finally, map the desired columns:
API Destination - OneDriveOneDrive Connector can be used to integrate OneDrive and your defined data source, e.g. Microsoft SQL, Oracle, Excel, Power BI, etc. Get, write, delete OneDrive data in a few clicks!

-
That's it; we successfully configured the POST API Call. In a few clicks we configured the OneDrive API call using ZappySys OneDrive Connector